The 100 Day Project

It seems like I’m always looking for new creative outlets, but rarely finding them. There are plenty of things I want to do — working on one of my writing projects, coding creative programs, etc. But it seems like I never have the time.

I know that lack of time isn’t really the problem. I just haven’t prioritized creative outlets and developed a habit. A great way to build a habit is to try to do something for an extended period of time and make yourself publicity accountable.

With that in mind, I was happy to come across the fifth annual The 100 Day Project, a “free, global art project that anyone can participate in.” Starting April 3rd, create something every day and post it on Instagram with the hashtag #The100DayProject.

I have a few ideas of things I want to work on, but no where near one hundred. They say “It’s okay if you miss a day! Keep going.” So that’s what I’ll do. Most of my “art” is writing, and I’m not really sure how that’s going to translate to Instagram, but it should be fun.

I hope to keep up around weekly blog posts here and work on some unannounced projects, too. Who knows, maybe in a hundred days I’ll be able to announce something new?

GitHub Security Alerts

GitHub recently introduced security alerts for Ruby and JavaScript applications. If they see that your application has dependencies with known security vulnerabilities, they will notify you.

New security vulnerabilities are discovered all the time, so it’s important that you keep your application and its dependencies up-to-date. I have first-hand experience with these alerts. Here’s what it looks like and how to fix any issues.

Notification

As you probably know, I wrote the book Rails Crash Course which was published back in October 2014. This book included two sample applications which are hosted on GitHub. Being over 3 years old, these applications now have outdated dependencies with known security vulnerabilities.

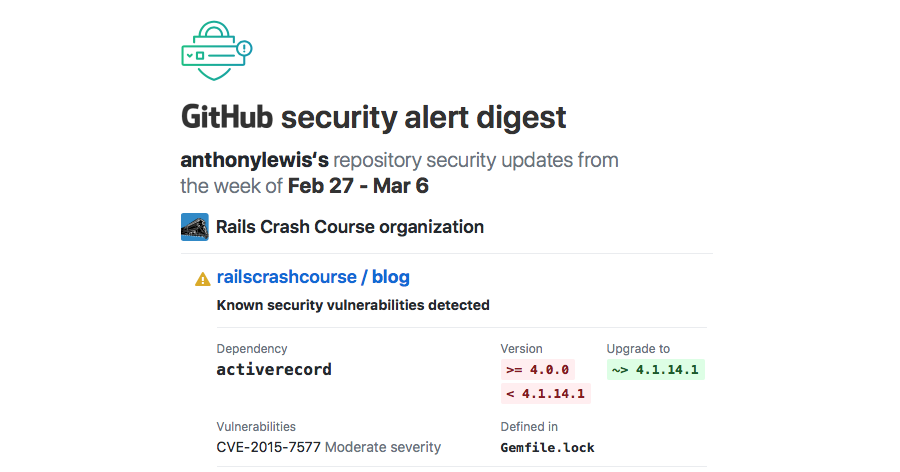
As promised, GitHub let me know about these vulnerabilities. First I received an email like this:

The email continues on for a total of 8 Ruby gems with known security vulnerabilities. Visiting the GitHub repo for this app, I’m greeted with this message:

Note that only the owner of the repo or other who have been specifically assigned access to vulnerability alerts can see this message. Otherwise, it would be easy for attackers to locate vulnerable applications.

Resolution

Looking over the listed vulnerable dependencies, I notice that all of the gems appear to be part of Rails. With that in mind, I’ll first update Rails.

Checking the application‘s Gemfile, I see that it’s using a fixed version of Rails. In this case the Gemfile is explicitly installing version 4.1.7. The security alert email recommends changing this to ~> 4.1.14.1.

The tilde followed by a greater than ~> forms an arrow that means to install a version of Rails matching all but the last digit in the given number. In this case, it means to install version 4.1.14.n, where n is any number greater than or equal to 1.

This way you can install security updates, while continuing to use the known good 4.1 version. Later versions, such as 5.2, may not be compatible with the application as written. Upgrading a Rails application to a new major version may require code changes and is a post for another day.

After updating the Gemfile, run the command bin/bundle update rails. This will take a few minutes as bundler resolves dependencies then downloads and installs the newer version of Rails. Once that’s complete, make sure the application still runs.

Not Quite Done

In a perfect world, this would be the end of this blog post. Unfortunately, Rails 4.1.14.1 also has a known security vulnerability. After pushing this change to GitHub, it recommended upgrading to version 4.2.5.1.

Of course, Rails 4.2.5.1 also has a known security vulnerability. This required an upgrade to Rails 4.2.7.1. GitHub also pointed out a security vulnerability in the version of the jquery-rails gem I was using. On their recommendation, I upgraded it to version ~> 3.1.3. And with that, I was done.

You can see the changes in the commit named Rails Security Update on GitHub. If you used a later version of Rails when you worked through the book you may not need these changes. Also, these instructions were only tested on Mac OS X. Users on Linux or Windows may need to make adjustments.

Back to WordPress

I usually try to avoid meta posts, that is blog posts about blogging, but I thought this might be interesting to others looking to setup their own site. A blog can really help when you’re looking for a job as a programmer. I speak from experience.

My Blogging Workflow

In a previous post I talked about switching to Jekyll so I could write my blog posts in Markdown and keep my site on Github. That was nice, but lately I’ve been spending more and more time writing in Ulysses.

I started using Ulysses around the time of NaNoWriMo. With Ulysses I still write in Markdown and I can write on my laptop, iPad, or iPhone. In Ulysses it’s easy to organize my writing and the iCloud synchronization makes everything available everywhere.

Ulysses even has built in support for publishing to Medium and WordPress. I like to own my content so, as the title suggests, I switched my site back to WordPress.

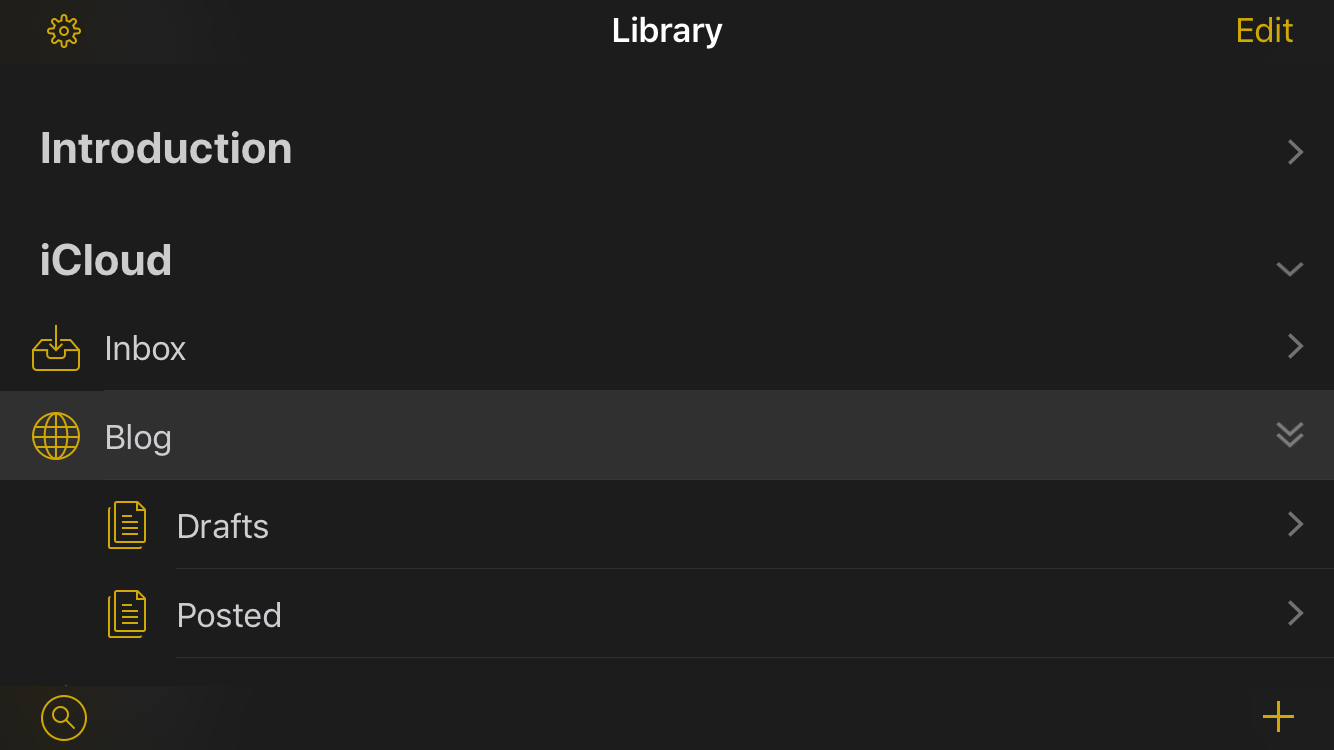
That’s a screenshot of a small part of my Ulysses library on my iPhone in Dark Mode. I have a folder named Blog and sub folders for Drafts and Posted posts.

Now whenever I come up with an idea for a blog post, I can quickly create a sheet for it. Then when I have some free time I can work on the post on any of my devices. Once it’s ready, I can publish to my site. Even from my iPhone, like I’m doing right now.

Portfolio Code

Now that your GitHub profile is looking good and you’ve set up your top project, it’s time to take a look at your actual code. As I said before, this is really what it all comes down to for most coding jobs. If you can’t prove your ability to write code, you won’t get the job.

Style

I usually start by trying to find the main part of the project. In a Rails app, this is typically a model file or maybe one of the controllers. For an Express app, I’ll start at app.js. For non-web apps, I’ll look for the main entry point. Once I’ve found a file with some real (not autogenerated) code in it, I look for several things.

Consistent Style – I’m not so concerned with whose style guide you follow, but I do expect you to pick one and stick to it. If you’re writing Ruby, use Rubocop. Your Python should always follow PEP 8. Check out Prettier if you need to clean up your JavaScript.

Clear Names – I’m fine with terse names and abbreviations, but I should be able to look at the name of a function and have some idea of it’s purpose. Variable names follow the same rules. Variables used only in loops or iterators can be single letters, but everything else should be easy to understand.

Idiomatic Code – Different languages naturally have different ways of performing the same task. For example, I wouldn’t expect to see a for loop used to iterate over an array in Ruby. I would expect to see an Enumerable method such as .each or .map. In Python, I would expect to see a list comprehension.

Tests

I don’t care when you write tests, as long as you write them. I’m not dogmatic about test-driven development, but I do expect production-ready code to have an automated test suite.

Include instructions for running your tests in the README file for the project. Also setup a continuous integration server, such as Travis CI, on your GitHub repo so the tests run automatically.

Beyond simply having a test suite, you need to make sure you’re testing the right things. Knowing what to test, and what not to test, is usually a sign of an experienced programmer.

It’s safe to assume that the framework you’re using is well tested. It’s not necessary to include tests that ensure that Rails associations and validations are working. It’s better to include tests that specify exactly what makes a model object and its associated objects valid or invalid.

Comments

In my experience comments are often not found in production code. This may come as a surprise to some programmers. Comments are typically only found before especially complex code or when something is implemented in a non-standard way. Comments used as documentation, before public classes and methods, are appreciated.

The most important rule is comment why something is done a certain way, not how it is done. I should be able to determine how something is done by reading the code. If I have questions about why the code was written that way I expect to find that answer in a comment.

Commit History

Finally, I like to also take a look at the commit history on a project. It’s interesting to see how long the candidate has been working on this project. Is this something that was put together just for a job search, or is this a real project?

You can learn a lot by someone’s commit messages. If I see a series of messages like “typo”, “fixing”, “fixing again”, “really fixing this time”, etc. I get a little worried. This is a red flag that maybe this person really doesn’t know what they’re doing.

I also see if more than one person has committed to the project. If so, I’ll go back to the code and check out the “Blame” view. Maybe that really impressive method I saw earlier was written by someone else. Group projects are fine, but never try to take credit for someone else’s work.
Your GitHub Portfolio

In my last post, I talked about how to setup your GitHub profile when looking for a job. Now that your GitHub profile page is looking good, shape up the details of your top repositories. You can customize the six popular repositories that appear on your profile page. These repositories should show off your best work and match the skills needed for the position you’re currently seeking.

When I’m reviewing a candidate, I sometimes skip the popular repositories and go to the repositories tab. I like to see what the candidate is currently doing. Projects appear in order by most recent commit on here. Since a recruiter or hiring manager might only look at one or two projects, be sure those at the top of the list look good.

Once I click on a project, it should be pretty easy to see what you’re trying to accomplish. Include a brief description at the top of the repo. Explain what the project does in simple terms. A few sentences is enough. You’ll provide complete details later in the README file.

Next, include a website. If this is a web application, this should probably be the address of a live demo. Even better, link to a post on your site that describes the project. That post should then link to the live demo. A demo running on a free Heroku site is fine.

As the reviewer scans down the list of files, there should be a clear structure. Most frameworks, such as Ruby on Rails, provide this structure for you. Things I look for include a breakdown of the application into components, usually following the model-view-controller pattern, and a test or spec directory.

After the list of files in the project, include a detailed README file. This is your chance to elaborate on the purpose of the project. What is special about this application? What technologies did you use to build it? What did you learn from this project?

Finally, explain how to run the project locally. What are the requirements, and how do I install the correct versions? Again, the framework and tools you use should make this easy. Hopefully everything is just a bundle or yarn command away.

Now that I know what your project is all about, it’s time to dig into the code. I’ll cover what I look for in a code review in my next post.

Looking For Engineers

We’re currently looking to hire two more experienced Ruby / JavaScript engineers here in the Sharethrough Austin office. This is one of the hardest parts of my job as an Engineering Manager. If you’re interested, I thought I’d offer a few tips to make it easier for recruiters and hiring managers to pick you out of the crowd of applicants.

After I look over an applicant’s resume or LinkedIn profile, the next place I go is their GitHub page. I have some advice about other parts of an engineering candidate’s application, and I’m already working on a few more posts like this one. Since GitHub is basically the first place I look, I’ll start here.

As someone looking for a job writing code, GitHub can be one of your most valuable assets. The most important question that a potential employer has about you is “can this person code?” If you can’t code, nothing else really matters. Even if you’re a perfect culture fit for the team, if you can’t contribute you won’t get the job.

Your GitHub profile and your code repositories should demonstrate your ability to get things done by writing code. The fastest way to learn programming is by doing. The best way to improve your ability is consistent practice. Write lots of code and share it publicly.

Your Profile

As with all profiles, I recommend you use your real, full name on GitHub. This isn’t required, of course, but be sure that your username is fairly easy to pronounce and remember. Imagine telling it to someone over the phone. Also, don’t use anything that someone might find offensive.

The same goes for your profile photo. A recent photo of yourself is best. It doesn’t have to be a professional headshot. A picture of you doing something you enjoy is fine. Almost anything is better than the default pixel art face.

Write a short bio about yourself. This doesn’t have to be anything fancy, just a few sentences about your interests and experiences. This could even be simply your job title and your current company. Add your real email address. This should be the same address you use on LinkedIn. If you have a personal website, link to it on your profile. If not, link to your profile on LinkedIn.

Your profile is also a great place to show off things that you’re passionate about other than coding. Maybe you’re on a mountain bike or climbing wall. If you’re wearing headphones in your photo, I might ask you about music. Feel free to show off your personality and interests, but do it in a way that still looks good to potential employers.

After the profile, I head over to the repositories tab next. I’ll finish up a post with my tips for polishing up your repositories in a few days.

Getting Started With D&D

Halfway through my 5th grade year, my family moved over 100 miles away from the small town where I was born to the Dallas / Fort Worth area. This was before the internet or any other cheap long distance communication. As an already nerdy kid, this was fairly traumatic for me.

One day, while bored in math class, I started drawing a dungeon on the graph paper we were supposed to be using for plotting points. Another kid noticed what I was doing and asked if I played D&D. I answered “yes” and made a friend. Even better, that kid bought a few of my maps with his lunch money.

These days, thanks in part to its appearance on shows like Stranger Things, lots of people are curious about Dungeons & Dragons. This, combined with the fairly recent release of the Fifth Edition rules means there’s no better time to get started playing Dungeons & Dragons.

The Starter Set

If you’re interested in playing, I recommend buying the Dungeons & Dragons Starter Set. Other than a few friends and some snacks, this box has everything you need.

For about $20 you get 5 pre-generated characters, a set of 6 dice, a 32-page rulebook, and a 64-page adventure. The included adventure, Lost Minds of Phandelver, is perfect for a new Dungeon Master.

Playing a few hours a week, the starter adventure usually takes 6-8 weeks to get through. At this point, you and your friends should be eager for more.

Beyond the Starter Set

Players wanting more options for making characters should buy the Player’s Handbook for about $30. This large, hard-cover book contains all of the rules and many more options for building characters.

The Dungeon Master will want to pick up the Monster Manual which details hundreds of monsters for the game. The Dungeon Master’s Guide contains more guidance for running adventures and rules around creating your own adventures and campaigns.

If you’d rather not build your own adventures, there are many campaign books. The latest release is Tomb of Annihilation, which takes place in the jungle region of Chult. Other popular choices are Storm King’s Thunder, which has the players face off against giants and Curse of Strahd, a gothic themed adventure which pits the players against the vampire Strahd.

Dungeons & Dragons is played by people around the world. You’ll find a thriving community on your social network of choice. There are Facebook groups, several popular subreddits, various groups live-streaming on Twitch, and many D&D personalities on Twitter. Hopefully this is the beginning of a lifetime of enjoyment in role playing games.

2018 Goals and Habits

Last year I focused mainly on my weight. I developed healthy habits around diet and exercise and I plan to continue those through 2018, and hopefully for the rest of my life.

My overall focus for 2018 is going to be creativity. I have lists of unstarted ideas and folders full of unfinished projects. I have ideas for books, websites, a tabletop game, screencasts, and other programs. I always said I would get back to these some day. This year, I’m going to find “some day.”

My secondary focus for 2018 is learning. Some of my ideas will require me to learn some new skills. I plan to use my creative projects to reinforce and grow my abilities in Python, data science, and machine learning.

I’m over half way through Python for Data Science and Machine Learning on Udemy. After that I’m either going to work through Practical Deep Learning for Coders on fast.ai or enroll in Andrew Ng’s Machine Learning Coursera Course. If I have time I might do both.

I truly believe that data science and machine learning are the future. I got lucky and learned Ruby on Rails at exactly the right time to make web development my career. I hope to catch the AI wave before it passes me by. Not that I think Ruby on Rails is going away any time soon.

So my goal for 2018 is to develop habits around writing, both prose and code, and learning via online classes and books. Carving out time for these new habits might be a challenge, but hopefully I can work on something creative every week. I’ll continue to work on the good ideas and scratch out the bad ones. All while continuing to learn and grow as a developer.

Looking Back on 2018

As we move forward into 2018, I can’t help but reflect on the previous year. So much has changed in our country and in society in general. It seems like there’s so much negativity in the world, but I try not to dwell on those things. Instead, I’d rather talk about a few positive things that I personally accomplished last year.

NaNoWriMo

In the month of November I wrote 21,288 words of a novel. That’s far short of the 50,000 word goal, but it’s over twenty-one thousand words I didn’t have in October. I started the month pretty strong, but then struggled and didn’t write at all around the Thanksgiving holiday. Even with the missed days I averaged over 700 words per day. Writing at that rate every day, I would have over 250,000 words by the end of this year.

Health

Starting in March 2017, I decided to finally get back in shape. I started counting calories and tracking my weight in the [Lose It!] app. I also started walking on the trail behind our house every day. I track my steps and daily workouts on my Apple Watch.

Doing this, I averaged about 10 pounds of weight loss per month for the first few months. By the end of the year I was eating around 1,500-1,600 calories and jogging 2-3 miles per day. Since March I’ve lost 65 pounds. I’ve continued counting calories and exercising for at least 30 minutes every day and don’t plan on ever stopping.

Habits

Most people that hear about my weight loss say I must have amazing willpower, but I don’t think that I do. Instead of mentally forcing myself to exercise every day, I made it a habit. It’s just something that I do every evening, usually right after dinner.

So much of what we do in life is based on what we’ve always done before. If you sit around and play video games every evening or watch Netflix, then you’ll probably continue to do those things. Trust me, I know.

One day I just decided to go for a walk instead of goofing off. I didn’t walk for very long, but I felt good afterwards. I kept going for walks every evening. Soon, I started seeing results. I could walk a bit farther each time. More importantly, I started losing weight. That’s very motivating.

This also explains why I failed at NaNoWriMo. I never really made it a habit. Instead of scheduling time for writing every day, I tried to squeeze the writing into my free time. Once my free time started getting shorter, I stopped writing. I hope to avoid making this mistake again this year.

NaNoWriMo 2017

About this time tomorrow I’ll hopefully be typing much faster than I am right now. November 1 is the first day of National Novel Writing Month, also known as NaNoWriMo 2017.

The goal is to type a 50,000 word novel from beginning to end in the month of November. That’s around 1,677 words per day, every day. That’s a lofty goal, but it’s not impossible. I’ve tried NaNoWriMo once before, in 2013 while I was writing Rails Crash Course, but you can’t really write a non-fiction book that quickly. I only hit 16,359 words. It required too much research and testing.

I’ve outlined my novel pretty well, and written lists of characters, scenes, and settings. I’ve also been doing a lot of research and reading leading up to the start. A quick Google search will turn up many blog posts and other online articles promising to prepare you for the event.

Blog posts are great, but I still enjoy old-fashioned books. My favorite is On Writing by Stephen King. He’s not my favorite author, but this book really speaks to me. I don’t follow his approach to writing. He’s more of a pantser, where as I’ve always been a plotter, but I still find his stories funny and inspirational.

In addition to King’s book, I’m listening to the Writing Excuses podcast. I can’t believe I just discovered this podcast. It’s been around for years – since 2008! It has a great cast. Brandon Sanderson usually leads the discussion. This season he’s joined by Mary, Dan, and Howard. New episodes come out weekly, and each is around 15 minutes of advice and inspiration.

When it comes time to actually put words on the page, my current tool of choice is Ulysses. It syncs to all of my devices via iCloud and makes it easy to organize projects into folders and quickly switch between them. It uses Markdown for formatting which is how I write everything, even the post you’re reading right now.

My plan is to try to total 1,200 words per weekday in two sprints – one in the morning and one in the evening. There are 22 weekdays and 8 weekend days in November. That means I’ll need to hit around 3,000 words per weekend day to hit 50,000.

This may be tough, but if it was easy everyone would write a novel.