Crafting Interpreters

I’ve been working my way through Crafting Interpreters by Robert Nystrom for the past few days. It’s an excellent book about creating your own programming language.

I was already familiar with Nystrom’s previous book Game Programming Patterns. A great book on design patterns, even if you’re not a game programmer.

Crafting Interpreters covers a new object-oriented scripting language called Lox. You’ll first implement a tree-walk interpreter in Java and then create a bytecode virtual machine in C.

I probably won’t ever directly use these skills in my day job, but gaining a deeper understanding of interpreters and virtual machines can’t hurt. Especially considering I split my time between the Ruby interpreter and Java VM.

Almost as interesting as the book itself is the way he wrote it using a combination of Markdown for prose and hand-drawn diagrams. More details are in his blog post Crafting “Crafting Interpreters”.

If the book sounds interesting to you, you can read it online for free at the link above. After reading the first few chapters onscreen, I bought a print copy. I like having the book open on my desk while writing code.

Code Kata

Over the course of interviewing for a coding job, you’ll be required to prove that you actually know how to write code. This is usually by solving a problem of some kind. This might be a take-home challenge, a pair-programming exercise, or even (shudder) coding on a whiteboard. Obviously, you’ll want to practice these kinds of problems.

Many of the problems used in interviews can be found online in the form of a code kata. The name code kata comes from the kata in martial arts. In martial arts this involves practicing a set of moves repeatedly until they become like a reflex. Here’s the definition of a code kata on Wikipedia:

an exercise in programming which helps programmers hone their skills through practice and repetition.

I’m not really happy with that definition. To me, a code kata is different in that you shouldn’t repeat the same problem. Instead, solve a variety of challenges to build your problem-solving and coding skills. Of course, if you aren’t happy with a solution, refactor it or even start over, but I feel like the biggest gain comes from solving a many different problems.

Coding

So, where do you find these problems? Here are a few websites I’ve used in the past:

Project Euler has hundreds of challenging mathematical and computer programming problems. If you work your way through this list, you’ll be ready for anything. Many of these will be too difficult for a beginning programmer.

CodeKata is a site by PragDave (aka Dave Thomas of the Pragmatic Programmers). According to Wikipedia, Dave Thomas was probably the first person to use the term code kata. This site has a collection of 21 challenges.

Exercism has a collection of practice problems in over 30 different programming languages. If you only visit one site on this list, start here. After you submit your solution, you can see other users solutions and give and receive feedback.

Refactoring

The sites above involve solving a problem of some kind, but The Gilded Rose kata is all about refactoring. You’re given a program and asked to add a feature. Unfortunately, the program is poorly written and has no tests. Rather than just add the new feature, you’re expected to also clean up the program.

After you try the kata on your own, check out the talk All the Little Things by Sandi Metz at RailsConf 2014. Sandi Metz is the author of the highly recommended book Practical Object-Oriented Design in Ruby and a great speaker. If you’re a Ruby developer, you should watch all of her talks (assuming you haven’t already seen them).

What is your experience with practice problems? Did I miss a great code kata resource? Do you think this is all a waste of time? I’d love to hear your thoughts about coding challenges such as these.

Your Resume

Now that your LinkedIn profile is looking good, use the information it contains to write your resume. A resume is not strictly required since most companies are happy with just a LinkedIn profile, but it never hurts to have one.

There are many fancy resume templates available online, but I recommend something clean and simple. I follow a format similar to the way my LinkedIn is setup.

Header

First, put your name at the top in large text. I used Microsoft Word’s Title style, a 28-point font. Under your name, put your LinkedIn address and contact information. Include at least your email address and phone number. Finally, finish off the first section with your summary statement. Here’s mine:

Experienced Engineering Manager and Software Engineer with a BS in Computer Science. Author of Rails Crash Course. Speaker, community organizer, teacher, mentor, blogger.

Experience

Add a heading, then list your experience. Put your job title in bold, followed by the company name and dates of employment. For your most recent roles, give 3-5 bullet points with the things you do as part of your job. Also include a list of technologies used in case someone is just scanning for keywords.

If you don’t have a lot of professional experience, include volunteer work or personal / freelance projects here. This is especially important if you’re seeking your first job as a software engineer. If you’re looking for a coding job, but your only experience is driving for Uber, then your resume isn’t really helping.

If you have a lot of experience, list fewer and fewer details for older jobs. For past positions maybe only list technologies used. For jobs that aren’t relevant to the position you’re currently seeking, only list the title, company, and dates. You might even leave these off assuming it wouldn’t look like a gap in employment.

Education

Finish up your resume with information about your education. List your college degree if you have one. List the bootcamp you attended and/or any online classes you’ve completed.

If you haven’t done any of these things, just leave this section off. I would avoid doing something clever like “graduate of the school of life.” Some hiring managers might think that’s cute, but others will probably discard your resume.

Done

I make no mention of skills other than as part of my employment history. I don’t see the need for a big block of skills. Anyone can type a list of programming languages, show me what you really know by listing some experience.

I also don’t mention references. Everyone knows you’ll provide references on request, so why bother taking up space on your resume? Many companies don’t even ask for references anymore.

My resume is just under two pages long. Many people will tell you that your resume should fit on a single page. I don’t see how that’s possible for someone with a few different jobs and some education. List everything you need and don’t worry about the length.

Finally, export your resume as a PDF. I don’t usually print my resume unless I’m going for an in-person interview. In that case, I print a few copies and stash them in my bag in case someone asks for it. So far no one has ever asked for a hard copy, but better safe than sorry.

Your LinkedIn Profile

The first thing I look at when someone applies for an engineering job is their LinkedIn profile. Even before I look at their resume. To me, there are two big benefits to going straight to LinkedIn:

  1. I can easily see how we’re connected. Do we know people in common? Maybe you used to work somewhere I used to work. Maybe you met someone I know in a user group. This connection could tell me what you’re really capable of, even if you aren’t good at selling yourself.
  2. It’s in a standard format. You can customize your profile page a little, but for the most part they all look the same. I know where to find your experience and education without thinking. It’s easy to quickly scan the page and get a sense of where you’ve been.

Intro

The first section is called the intro. As I said in my post about your GitHub profile, put a current, recognizable picture of yourself here. Next, add a headline consisting of your current job title and employer.

If you aren’t currently working, or aren’t working in technology, I would be a little more creative here. Are you doing any freelance work, writing, or teaching? If nothing else, write something like “Aspiring Software Engineer.”

Finally, add your summary. This is basically your elevator pitch. Think of one or two sentences that quickly tell an employer what you can do.

Experience & Education

The experience section can be a challenge for someone seeking their first coding job. How can you list experience when you don’t have any? Obviously, you can’t. If you’re currently working outside of the technology world, you should list your job. Even if it’s barista at Starbucks.

Once you land your first technical job remove your earlier experience, unless you can make a compelling case for how it might make you more attractive to a future employer. For example, if you had management experience in a previous, non-technical job, you might want to keep that on your profile.

Include a few sentences or bullet points describing what you accomplished at each of your previous jobs. If you aren’t sure what to write or how to word your accomplishments, try looking at job postings for similar jobs. Recruiters work hard getting the wording just right on their postings. Reuse their work.

You can also add volunteer experience in this section. Many organizations need help building or updating their web site. You can also volunteer to teach coding or other skills in your free time. Code.org is always looking for programmers to volunteer to teach coding to kids in the classroom.

The education section should be straight-forward. If you have a college degree, list it here along with your major field of study. Similarly, if you attended a coding bootcamp, list it here. You can also include relevant online courses such as those at Udemy,Coursera, or freeCodeCamp.

Skills & Endorsements

List skills such as programming languages and frameworks, industry knowledge, and interpersonal skills in this section. If you have demonstrated these skills to other people, ask them to endorse you. An endorsement from someone tells me that you truly have the listed skill.

Recommendations

Personal recommendations can be hard to get. Give recommendations and hope that the recipient will recommend you in turn. I would also directly ask for recommendations from managers and coworkers. Just be aware that asking for a recommendation on LinkedIn can be interpreted as a sign that you’re looking for a new job.

Accomplishments

Use the accomplishments section to highlight things like publications you’ve written, awards you’ve earned, or special projects you’ve completed. This can be a great way to fill out your profile if you don’t have a lot of experience yet. Also, include any foreign languages you speak here.

Go Web App Walkthrough

As a follow up to my previous post, I thought I would walk through the basic web app I built using Go, Gin, and GORM. I realize this might not be the most idiomatic Go program, but I was going for simplicity and brevity.

You can find this code in the file main.go in my goweb GitHub repo.

The Code

Every Go application starts with a package definition. Since this program is an executable and not a library, call this package main. This tells the compiler that the main function, where execution starts, is found here.

package main

Next, import libraries needed by the program. In this case gin and gorm, as mentioned earlier, as well as the GORM postgres driver. The program needs godotenv and os for loading environment variables and finally net/http which defines HTTP status codes.

import (
    "github.com/gin-gonic/gin"
    "github.com/jinzhu/gorm"
    _ "github.com/jinzhu/gorm/dialects/postgres"
    "github.com/joho/godotenv"
    "net/http"
    "os"
)

Next, define the User model. This is a standard Go struct that includes gorm.Model. This adds ID and time stamp fields.

type User struct {
    gorm.Model
    Name string
}

The global variable db is used throughout the program to send queries to the database.

var db *gorm.DB

The usersIndex function is a request handler. It finds an array of users in the database and uses the Gin context to render them as HTML using the index.html template.

func usersIndex(c *gin.Context) {
    var users []User

    db.Find(&users)

    c.HTML(http.StatusOK, "index.html", gin.H{
        "users": users,
    })
}

Finally, the main function, where execution begins.

func main() {

First, load the contents of the .env file. If there’s an error, panic. That is, end the program with an error message.

    err := godotenv.Load()
    if err != nil {
        panic("Error loading .env file")
    }

Now that the environment is loaded, use the DATABASE_URL variable to connect to the database. Again, panic if there is an error. The defer statement calls dB.Close() when this function ends to close the database connection.

    db, err = gorm.Open("postgres", os.Getenv("DATABASE_URL"))
    if err != nil {
        panic(err)
    }
    defer db.Close()

Use the connection to auto migrate the database. This creates the users table, based on the plural version of the model name, with columns named id, created_at, updated_at, deleted_at, and name.

    db.AutoMigrate(&User{})

Next, count the number of users in the database. If there are zero users, create a few examples. You might think of this as seed data.

    count := 0
    db.Table("users").Count(&count)

    if count == 0 {
        db.Create(&User{Name: "Alice"})
        db.Create(&User{Name: "Bob"})
        db.Create(&User{Name: "Carol"})
    }

Create a Gin router using gin.Default().

    router := gin.Default()

Tell the router where to find static files, such as CSS, JavaScript, and images. Also, load the HTML files in the templates directory.

    router.Static("/assets", "./assets")
    router.LoadHTMLGlob("templates/*")

Next, tell the router to handle GET requests to the root path by calling the usersIndex function defined earlier.

    router.GET("/", usersIndex)

Finally, call router.Run() to start handling requests in a loop.

    router.Run()
}

And with that you have a complete program that uses data from a database to render HTML templates in response to web requests.
From Rails to Go

A recent project at work required a high performance API and a light-weight front end. I’ve been looking for an opportunity to explore other languages and frameworks and this seemed like a perfect opportunity. We already have a few services written in Go, so I decided to start there.

The Go Programming Language is a “fast, statically typed, compiled language.” In other words, very different from Ruby (which is dynamically typed and interpreted). In Ruby, everything is an object; Go doesn’t have classes. Yes, very different.

Web

With my choice of programming language set, it was time to find a web framework. After a bit of Googling, I came upon Gin. It promises “performance and productivity” which is exactly what I needed.

Gin features a very fast router for processing requests as well as easy rendering of responses in JSON or HTML. Gin uses the html/template package for rendering dynamic HTML pages (also see text/template for complete documentation).

Database

The next step was database access. I typically work with Active Record, so I started searching for something similar. GORM is an ORM Library in Go. It is full-featured (almost) and developer friendly. Its API is similar to Active Record and it supports all of the features I need including a PostgreSQL driver.

Creating models is easy using GORM. Define the model as a Go struct and include gorm.Model to add ID and timestamp columns. Then pass the model to db.AutoMigrate and GORM will create a table with the required columns automagically. The migration doc has examples of automatic and manual migrations.

Miscellaneous

Since I plan on eventually deploying this application to Heroku, and Heroku uses an environment variable for the DATABASE_URL, I’m also using the Go port of Ruby’s dotenv project named godotenv to load environment variables in development.

Sample App

I posted a complete sample application named goweb on GitHub. Feel free to clone that repo as a starting point for your own creations. The README file includes instructions for setting everything up on a Mac with Homebrew.

If you aren’t on a Mac, you should be able to follow the Go installation instructions and then download PostgreSQL to get the sample app running. Hopefully this will help others looking to explore web development with Go.

On Dwitter

I’m not going to post about this every day, but in case you missed my last post, this is the first day of #The100DayProject. To see what it’s about, search for #the100dayproject on Instagram.

My first creation is a JavaScript animation on Dwitter.net. I posted the video below on Instagram, but the real thing looks much better. Especially in full screen.

If you haven’t heard of Dwitter.net, its creators describe it like this:

Dwitter.net is a challenge to see what awesomeness you can create when limited to only 140 characters of javascript and a canvas.

I would also say that it’s a great way to kill a few spare minutes during the day. It’s fun and you’ll probably learn something in the process. I wrote code this morning while enjoying a cappuccino.

If you’re interested in JavaScript, go to my first dweet to see the 76 characters that make this work. Also, check out my Dwitter.net profile for future creations. Hopefully my next dweet will be a little more colorful.

GitHub Security Alerts

GitHub recently introduced security alerts for Ruby and JavaScript applications. If they see that your application has dependencies with known security vulnerabilities, they will notify you.

New security vulnerabilities are discovered all the time, so it’s important that you keep your application and its dependencies up-to-date. I have first-hand experience with these alerts. Here’s what it looks like and how to fix any issues.

Notification

As you probably know, I wrote the book Rails Crash Course which was published back in October 2014. This book included two sample applications which are hosted on GitHub. Being over 3 years old, these applications now have outdated dependencies with known security vulnerabilities.

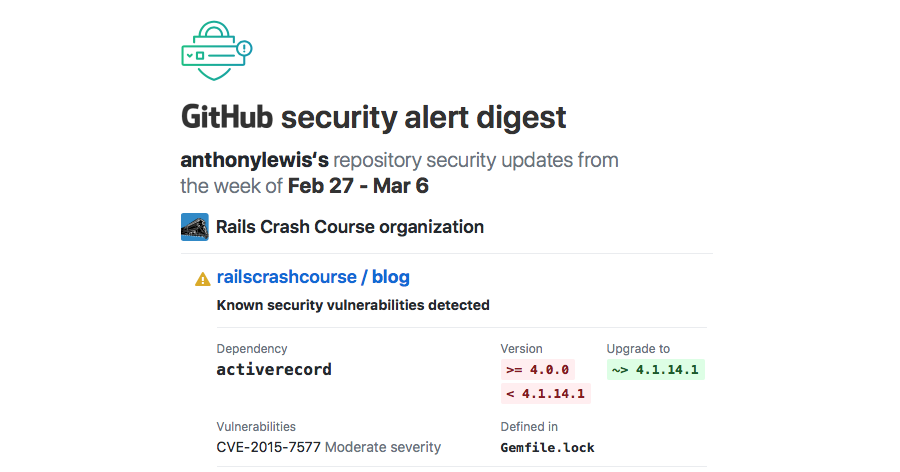
As promised, GitHub let me know about these vulnerabilities. First I received an email like this:

The email continues on for a total of 8 Ruby gems with known security vulnerabilities. Visiting the GitHub repo for this app, I’m greeted with this message:

Note that only the owner of the repo or other who have been specifically assigned access to vulnerability alerts can see this message. Otherwise, it would be easy for attackers to locate vulnerable applications.

Resolution

Looking over the listed vulnerable dependencies, I notice that all of the gems appear to be part of Rails. With that in mind, I’ll first update Rails.

Checking the application‘s Gemfile, I see that it’s using a fixed version of Rails. In this case the Gemfile is explicitly installing version 4.1.7. The security alert email recommends changing this to ~> 4.1.14.1.

The tilde followed by a greater than ~> forms an arrow that means to install a version of Rails matching all but the last digit in the given number. In this case, it means to install version 4.1.14.n, where n is any number greater than or equal to 1.

This way you can install security updates, while continuing to use the known good 4.1 version. Later versions, such as 5.2, may not be compatible with the application as written. Upgrading a Rails application to a new major version may require code changes and is a post for another day.

After updating the Gemfile, run the command bin/bundle update rails. This will take a few minutes as bundler resolves dependencies then downloads and installs the newer version of Rails. Once that’s complete, make sure the application still runs.

Not Quite Done

In a perfect world, this would be the end of this blog post. Unfortunately, Rails 4.1.14.1 also has a known security vulnerability. After pushing this change to GitHub, it recommended upgrading to version 4.2.5.1.

Of course, Rails 4.2.5.1 also has a known security vulnerability. This required an upgrade to Rails 4.2.7.1. GitHub also pointed out a security vulnerability in the version of the jquery-rails gem I was using. On their recommendation, I upgraded it to version ~> 3.1.3. And with that, I was done.

You can see the changes in the commit named Rails Security Update on GitHub. If you used a later version of Rails when you worked through the book you may not need these changes. Also, these instructions were only tested on Mac OS X. Users on Linux or Windows may need to make adjustments.

Portfolio Code

Now that your GitHub profile is looking good and you’ve set up your top project, it’s time to take a look at your actual code. As I said before, this is really what it all comes down to for most coding jobs. If you can’t prove your ability to write code, you won’t get the job.

Style

I usually start by trying to find the main part of the project. In a Rails app, this is typically a model file or maybe one of the controllers. For an Express app, I’ll start at app.js. For non-web apps, I’ll look for the main entry point. Once I’ve found a file with some real (not autogenerated) code in it, I look for several things.

Consistent Style – I’m not so concerned with whose style guide you follow, but I do expect you to pick one and stick to it. If you’re writing Ruby, use Rubocop. Your Python should always follow PEP 8. Check out Prettier if you need to clean up your JavaScript.

Clear Names – I’m fine with terse names and abbreviations, but I should be able to look at the name of a function and have some idea of it’s purpose. Variable names follow the same rules. Variables used only in loops or iterators can be single letters, but everything else should be easy to understand.

Idiomatic Code – Different languages naturally have different ways of performing the same task. For example, I wouldn’t expect to see a for loop used to iterate over an array in Ruby. I would expect to see an Enumerable method such as .each or .map. In Python, I would expect to see a list comprehension.

Tests

I don’t care when you write tests, as long as you write them. I’m not dogmatic about test-driven development, but I do expect production-ready code to have an automated test suite.

Include instructions for running your tests in the README file for the project. Also setup a continuous integration server, such as Travis CI, on your GitHub repo so the tests run automatically.

Beyond simply having a test suite, you need to make sure you’re testing the right things. Knowing what to test, and what not to test, is usually a sign of an experienced programmer.

It’s safe to assume that the framework you’re using is well tested. It’s not necessary to include tests that ensure that Rails associations and validations are working. It’s better to include tests that specify exactly what makes a model object and its associated objects valid or invalid.

Comments

In my experience comments are often not found in production code. This may come as a surprise to some programmers. Comments are typically only found before especially complex code or when something is implemented in a non-standard way. Comments used as documentation, before public classes and methods, are appreciated.

The most important rule is comment why something is done a certain way, not how it is done. I should be able to determine how something is done by reading the code. If I have questions about why the code was written that way I expect to find that answer in a comment.

Commit History

Finally, I like to also take a look at the commit history on a project. It’s interesting to see how long the candidate has been working on this project. Is this something that was put together just for a job search, or is this a real project?

You can learn a lot by someone’s commit messages. If I see a series of messages like “typo”, “fixing”, “fixing again”, “really fixing this time”, etc. I get a little worried. This is a red flag that maybe this person really doesn’t know what they’re doing.

I also see if more than one person has committed to the project. If so, I’ll go back to the code and check out the “Blame” view. Maybe that really impressive method I saw earlier was written by someone else. Group projects are fine, but never try to take credit for someone else’s work.

Your GitHub Portfolio

In my last post, I talked about how to setup your GitHub profile when looking for a job. Now that your GitHub profile page is looking good, shape up the details of your top repositories. You can customize the six popular repositories that appear on your profile page. These repositories should show off your best work and match the skills needed for the position you’re currently seeking.

When I’m reviewing a candidate, I sometimes skip the popular repositories and go to the repositories tab. I like to see what the candidate is currently doing. Projects appear in order by most recent commit on here. Since a recruiter or hiring manager might only look at one or two projects, be sure those at the top of the list look good.

Once I click on a project, it should be pretty easy to see what you’re trying to accomplish. Include a brief description at the top of the repo. Explain what the project does in simple terms. A few sentences is enough. You’ll provide complete details later in the README file.

Next, include a website. If this is a web application, this should probably be the address of a live demo. Even better, link to a post on your site that describes the project. That post should then link to the live demo. A demo running on a free Heroku site is fine.

As the reviewer scans down the list of files, there should be a clear structure. Most frameworks, such as Ruby on Rails, provide this structure for you. Things I look for include a breakdown of the application into components, usually following the model-view-controller pattern, and a test or spec directory.

After the list of files in the project, include a detailed README file. This is your chance to elaborate on the purpose of the project. What is special about this application? What technologies did you use to build it? What did you learn from this project?

Finally, explain how to run the project locally. What are the requirements, and how do I install the correct versions? Again, the framework and tools you use should make this easy. Hopefully everything is just a bundle or yarn command away.

Now that I know what your project is all about, it’s time to dig into the code. I’ll cover what I look for in a code review in my next post.